Monday, May 9, 2011

Coconut Milk Whipped Cream

I have been on a mission to figure out how to make coconut milk whipped cream for some time. I have read on several blogs how good it is, but haven't had much success. But if something is worth doing, keep on trying. :) I have finally figured out the secret to making this awesome whipped cream. It is actually very easy and oh so GOOD!


Coconut Milk Whipped Cream

The secret to making this is to plan ahead. But a can of coconut milk in the fridge at least 24 hrs before you want to make the whipped cream. The longer the better. I actually keep a can or 2 of coconut milk in my fridge, just for this. You also need to put the mixer bowl and whisk attachment of your mixer into the freezer for about 4 hrs. Until it's nice and COLD.

Then when you are ready for some whipped cream, scoop out the coconut cream out of the can, being careful to only get the cream. Whip the cream in the mixer until it starts to thicken and look like whipped cream.

Add 1/8 cup honey
1 tsp vanilla

Continue to whip until soft peaks form. You can use immediately or place in the fridge. This lasts in the fridge for 24 hrs. Maybe even longer, but that's the longest I've had it in the fridge with no problems. It's too good not to eat right away!

Enjoy!!

Sunday, March 27, 2011

Almond Butter Granola

I've been buying peanut butter granola for a long time. I really like anything with peanut butter in it and that has been my breakfast of choice for a while now. My son loves peanut butter granola as well, and I always felt bad that he couldn't have it.

Since there is a very limited selection on breakfast cereals that my son can have, I decided to make some almond butter granola for him. I've never made granola before, so figured this was as good of a time as any. I'm happy to say that my first attempt was a success!! :)


Almond Butter Granola
  • 6 tablespoons oil
  • 1 cup almond butter
  • 1/2 cup maple syrup
  • 7 cups oats
  1. Cook oil and almond butter over low heat until it is melted and smooth.
  2. Remove from heat and maple syrup.
  3. Add oats and stir well until oats are coated.
  4. Spread onto cookie sheet.
  5. Bake at 350 for 20 minutes stirring at least once.
  6. Cool and store in an airtight container.
Enjoy!! We've been enjoying it with some homemade almond milk. Yum, yum!

Sunday, February 20, 2011

Chocolate Shortbread Cookies

Oh, poor neglected blog! I have had 'blogger's block' for way too long. We discovered in November that my son has multiple food sensitivities/allergies. So we embarked on an elimination diet of sorts. Not a full elimination diet, mind you, but it was enough. Plenty to overwhelm me a bit. I mean cooking gluten and dairy free is one thing, but cooking without gluten, dairy, peanuts, eggs, corn and soy is quite different! Corn is the hardest, because it's in everything. And since it's not one of the top 8 allergens, it doesn't have to be on the label and it's hidden in a lot of ingredients. So that means absolutely no eating out and cooking everything from scratch. I normally cook from scratch anyway, but this seemed to go to a whole new level.

Anyway, my son is still on this diet and I am finally feeling confident with cooking again. Confident enough that I decided that a valentine's day treat was definitely in order. Baking is extremely hard, with no gluten or eggs to hold things together. It didn't matter with these cookies though...they came together just beautifully. The cookies were not crumbly, just chocolatey, not too sweet and GOOD. But the best part? They make the perfect cookies for ice cream sandwiches! YAY!!! :) :)


Chocolate Shortbread Cookies (I found this awesome recipe in Living Without)

1 cup butter or soy free earth balance spread
2/3 cup brown sugar, loosely packed
1 tsp vanilla
2 1/2 cups plus 2 Tbsp gf all purpose flour mix of your choice (I used the Analiese Roberts mix)
1/2 tsp xanthan gum (or if you are avoiding corn, guar gum)
1/8 tsp salt
1/4 cup unsweetened cocoa powder

  • Preheat oven to 325. Line a baking pan with parchment paper.
  • Using a mixer, beat together butter/butter substitute and sugar for around 5-7 minutes.
  • Add vanilla and gently combine. Set aside
  • In a medium bowl, mix together flour blend, xanthan gum (or guar gum), salt and cocoa powder.
  • Add dry ingredients to butter mixture, mixing on low speed until ingredients are combined. Don't over mix. Put dough in the fridge for 30 minutes.
  • Dust cutting board with some of the flour mix. Place dough on board and roll out until about 1/2 inch thick. Use a cookie cutter and cut into desired shape. Space evenly on prepared baking sheet.
  • Bake in preheated oven for 16-18 minutes or until they are golden brown. Let cool on the baking sheet.
  • Enjoy!

They are good plain, but even better as an ice cream sandwich. Yum! :)

If you're looking for more great gluten free recipes, check out Gluten Free Wednesdays over at the Gluten Free Homemaker.


Monday, November 8, 2010

Chocolate Cake with Marshmallow Frosting

Here I am with another chocolate dessert! Looking through my blog, I'm noticing a lot of chocolate desserts. We really do eat more than just chocolate cake/cookies/chocolate chips around here. Guess I tend to just post our desserts....I need to start posting our main course meals too. I've been trying quite a few vegetarian dishes and we're really liking how they turn out. I'll get some of those dishes lined up soon.

My hubby had a birthday recently. Birthdays mean birthday cake, no matter how old you are in my book. So chocolate cake with marshmallow frosting it is.


The chocolate cake is made with coconut flour, which makes a really good, rich cake. Cakes made with coconut flour taste the best at room temperature. The frosting is made with no refined sugar. I found several variations of this recipe around the web, made with either corn syrup, agave or honey. I chose the honey option and it ended up giving it a toasted marshmallow taste. Yum!!


On to the recipe!

Chocolate Cake (from Cooking with Coconut Flour by Bruce Fife)

3/4 cup butter, earth balance or coconut oil
1 cup cocoa powder
12 eggs
1/2 cup coconut milk or whole milk
2 1/4 cups sugar
1 tsp salt
1 tsp vanilla
1 cup sifted coconut flour
1 tsp baking powder

Melt butter (I used earth balance soy free spread) in saucepan over medium heat. Mix in cocoa powder. Remove from heat and set aside. In a bowl, mix together eggs, coconut milk, sugar, salt and vanilla. Stir cocoa mixture into the egg mixture. Combine coconut flour with baking powder and whisk into batter until there are no lumps. Pour batter into either a greased 11x7 in pan, or 2 greased 8 or 9 1/2 inch layer cake pans. Bake at 350 for 35 to 40 minutes or until toothpick inserted in center of cake comes out clean. Cool and remove from baking pan(s). Fill and frost with marshmallow frosting or frosting of your choice.


Marshmallow frosting
I found this recipe here. She has pictures and detailed instructions on how to make this yummy frosting.


Want to have a piece? Come on over!! We have way more cake than the 4 of us can eat! But we're going to enjoy every bite. :)

Friday, October 8, 2010

Chocolate Zucchini Cake

I have found the perfect use for zucchini. Put it in a cake with some chocolate and you've got yourself an awesome, moist, yummy chocolate cake!! This is one of my absolute favorite cake recipes. I intended to frost it with a vanilla frosting, but we ate it all before I even thought about frosting. Seriously, it didn't need a bit of frosting.

I pureed several zucchini, divided it all up into 1 cup containers and froze them so I make this cake again even in the middle of winter.


Chocolate Zucchini Cake

Cream:
1 stick (1/2 cup) butter or earth balance
1 tablespoon shortening
1 1/2 cup sugar

Add & beat well:
2 eggs

Add
1 cup unsweetened pureed fresh zucchini

1 1/2 cup gluten free flour mix
1/2 cup unsweetened cocoa powder
1/2 teaspoon xanthan gum
1/4 teaspoon salt
1 teaspoon baking powder
1/2 teaspoon soda

Beat until smooth. Bake in greased 8" x 8 square baking pan at 350F for 45 minutes (If you bake in glass, reduce the heat by 25F).

Frost with your favorite vanilla frosting recipe.....or not. :) It's awesome either way.


Monday, August 30, 2010

Pie crust

One thing that we like quite a lot around here is pie. Fruit pie of any kind. I haven't made many pies lately, mainly because I haven't found a recipe that I liked. It seems like gf pie crust is either a pain to work with, but end result is good, or it's easier to work with and the end result is lousy.

I have found a pie crust recipe that is awesome. Just awesome. It is super easy to work with... you mix it in a mixer and you can actually roll it out in between wax paper. The best part of all? The result is a nice flaky crust.

So after finding this recipe and peaches being in season, what's a girl to do but make a peach pie?


The pie. The top crust didn't even break when I put it on. Yay!


I found this recipe in Annaliese Roberts cookbook, Gluten Free Baking Classics. (I LOVE her cookbook, can you tell?)

Pie crust

1 cup plus 2 Tbsp brown rice flour mix (see below)
2 Tbsp sweet rice flour
1 Tbsp sugar
1/2 tsp xanthan gum
1/4 tsp salt
6 Tbsp cold butter or Earth Balance Buttery spread
1 large egg
2 tsp lemon juice

Prepare pie pan by greasing. Preheat oven to 375.

Mix flours, sugar, xanthan gum and salt in bowl of electric mixer. Add butter and mix until crumbly (resembling coarse meal)

Add egg and lemon juice. Mix on low speed until dough holds together, it should not be sticky*. Form dough into a ball and place on a sheet of wax paper. Top with 2nd sheet of paper and flatten dough to 1 inch thick.

Roll out dough between the wax paper. Remove top sheet of wax paper and invert dough into pie pan. Remove remaining sheet of wax paper and crimp sides for single crust**.

Bake crust for 10 minutes. Remove from oven, fill, place top crust on and bake as per recipe.

For a bottom pie crust with no top crust, bake at 375 for about 25 minutes or until golden.

* My crust seemed a bit dry when I made it, so I added water a tablespoon at a time until it seemed the right consistency. I ended up adding 2 tbsp.

** This recipe is for a single bottom or single top crust. I had a lot leftover, and was able to make both top and bottom with 1 batch.

Brown rice flour mix:

2 cups brown rice flour
2/3 cup potato starch
1/3 cup tapioca flour


Enjoy!

Sunday, August 15, 2010

Banana Bread with Chocolate Chips

Banana bread.....what's not to like? I've tried several recipes for gf banana bread over the years. Most of them have tasted pretty good, but the texture wasn't the strong point and they always seem to fall apart. But try, try again. :) I have been recently browsing the gluten free goddess's blog and drooling over all of her tasty recipes. She had a banana bread recipe with chocolate chips that I knew I had to try. Why? Because it was also a vegan recipe, meaning no dairy. I am by no means vegan. But with our dairy issues in this household I appreciate vegan recipes a whole lot these days. :) Plus it had chocolate chips in it. What else could I do?

It turned out to be the best gluten free/dairy free banana bread I have ever had. It's been a while since I've had wheat banana bread, but I might even dare to say that it was better than that. Maybe it was the chocolate chips. But the texture was great, it didn't fall apart as soon as you thought about slicing off a piece either. The loaf lasted 2 days.


Banana Bread with Chocolate Chips

Here is the original recipe from the gluten free goddess
Her recipe is vegan, so has no eggs in it. We have chickens and have an abundance of good eggs, so I changed it to add some eggs.

Preheat oven to 350 degrees F. Lightly grease a standard bread loaf pan.

Combine in a large bowl:

3-4 ripe bananas, mashed (about 1 cup)
1/3 cup light olive oil
1 cup light brown sugar
2 teaspoons vanilla

2 eggs

In a separate bowl:
1 1/2 cups gluten free flour mix
1 teaspoon baking soda
1 1/2 teaspoons baking powder
1/4 teaspoon sea salt
1/2 teaspoon xanthan gum
1 rounded teaspoon cinnamon


Add the dry ingredients into the banana mixture and stir until smooth.

Add in 1/2 cup dairy free chocolate chips


Pour the batter into the prepared loaf pan and bake in the center of a preheated oven for an hour, until the loaf is firm and a toothpick inserted in the center comes out clean

Cool the loaf on a wire rack. Slice and enjoy!


Thank you, gluten free goddess for this awesome recipe!


Friday, July 9, 2010

Fish fry!

A few weeks ago my hubby was hungry for batter fried fish and so set out to have a gf fish fry. He found several recipes for batter, combined a few together and then made it gluten free. It was everything batter fried fish should be, except not as greasy which I think is a good thing.

Batter Fried Fish

Ingredients

  • 3/4 - 1 lb boneless fish fillets (tilapia, cod, perch, walleye, etc) -we used tilapia
  • Oil for frying (safflower, peanut oil, non-hydrogenated shortening are all good)
  • 1 cup Bob's Red Mill All-Purpose Gluten Free Flour ( or any gf flour mix)
  • 1 cup cornstarch (or leave out and decrease liquids)
  • 1/2 tsp cayenne pepper
  • 1/2 tsp garlic powder
  • 1 tsp onion powder
  • 1/4 - 1/2 tsp black pepper
  • 1 tsp baking powder
  • 1 tsp salt
  • 6 - 12 oz gluten-free beer or club soda (~12 if using cornstarch. Add slowly to ensure proper consistency)

Procedure

  • Start heating oil in a fryer or deep pan. Heat to about 365F
  • Mix all dry ingredients thoroughly and then stir in the beer or club soda until a thin batter is formed. Batter should drip off the fillets when dunked.
  • Ensure oil has reached 365F
  • Dip fillets in the batter and then carefully place in the oil. Fry until golden brown, about 3-4 minutes per fillet.
  • Scoop out cooked fillets and place on paper towels to drain. Serve hot.

Saturday, June 12, 2010

Living Without and Blueberry Scones

I recently got a subscription to Living Without, a magazine dedicated to gluten free and dairy free cooking. Lots of good recipes, articles and the like. I also discovered that they have a website as well. Tons of recipes and substitution ideas. I have found a lot of recipes that I want to try.

One recipe I did try was the Blueberry Scone recipe. I love scones and have been missing them since our family has been gluten free. This scone is very dense, but perfect with a cup of tea or coffee. I followed the directions and made them about 2 inches thick, but next time I will make them a little thinner. Maybe 1 inch instead. Did I mention that this recipe is also dairy free? And to top it off, it didn't have any soy in it either. Bonus!
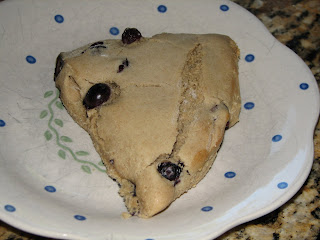

Blueberry Scones from Living Without Magazine:

2¾ cups brown rice flour
1½ cups + 1 tablespoon garbanzo bean flour
1 teaspoon baking powder
½ teaspoon baking soda
¾ teaspoon sea salt
1 teaspoon ground cinnamon
1 cup canola oil
1 cup sugar
1 cup almond milk
¾ cup fresh or frozen blueberries (I used fresh)

1. Combine the brown rice flour, garbanzo bean flour, baking powder, baking soda, salt and cinnamon in a large bowl. In the bowl of a standing mixer fitted with the paddle attachment, combine the canola oil and sugar until well mixed. With the mixer on low speed, add the flour mixture and rice milk alternately, a little at a time, until well mixed, about 3 minutes. Chill the dough for at least 3 hours or overnight.

2. Preheat the oven to 375 degrees.

3. Dust your counter liberally with brown rice flour. Knead the blueberries into the chilled dough and pat the dough into a 2-inch thick disc*. Cut the disc into 8 wedges. Place the wedges onto a greased or parchment-line baking sheet, spaced evenly apart. Bake until scones are golden brown and firm to the touch, about 30 minutes.

* I would recommend patting the dough into a 1-inch thick disk. The scones rise a bit in the oven and tend to get rather large.

Sunday, June 6, 2010

Chocolate Mint Ice Cream (dairy free)

Hi all. Did you think I dropped off of the face of the earth? It's been a rough spring with sick kids, so I haven't had much time to think about blogging. Thankfully we're all healthy and we're on to summer.

It's been really hot the last week or so here, so I decided to try to make some dairy free ice cream to cool us off a bit. Sure, you can buy some really good dairy free ice cream at the store....Coconut Bliss is a favorite around here. But there's something about homemade ice cream. This ice cream was super easy to make, very refreshing and good! Trust me, you won't be thinking that it's a dairy free treat.....it's just a good chocolate treat! :)


Chocolate Mint Ice Cream

2 teaspoons kosher gelatin

1/4 cup peppermint tea, room temperature

1/4 cup honey

3-1/4 cups chocolate almond milk


1. In a small bowl, sprinkle gelatin over apple juice. Let sit, stirring occasionally, until gelatin is dissolved and softened, about 10 minutes.

2. In a medium saucepan, whisk together honey and 2 cups almond milk. Cook until just hot, stirring frequently; remove from heat. Add softened gelatin to hot milk mixture, stirring until gelatin is completely dissolved. Stir in remaining almond milk; let cool, cover, and refrigerate until very well-chilled ( I chilled it for about 8 hrs)

3. Spoon chilled mixture into the canister of an ice cream maker and make the ice cream per the manufacturers directions.

Makes about 1 quart.


Wednesday, March 31, 2010

Awesome gluten free bread

I recently tried a new gluten free bread recipe that we are LOVING. I've had this recipe for a while, but always passed by it because it calls for powdered milk which doesn't work for my daughter. Sure you can get powdered soy milk, but we still have the same problem. So without a good substitute, I passed it up. I then learned that you can replace powdered milk with sweet rice flour. Happy day! I decided to try this recipe with that substitution.....and it worked!


The first time I made this bread, it was good but after a couple days it started to crumble. A few tweaks and this bread is a keeper. It may be due to altitude (we live at 7,000 ft) but I found after adding a bit more water (~ 2 Tbsp) and baking it at the minimum baking time, that was all it took. No more crumbly bread. I have a hard time keeping this bread in the house....my family gobbles it up!

Ok, ok. Enough chatter.....on to the recipe! :)

White Bread
adapted from 125 Gluten Free Recipes by Donna Washburn and Heather Butts

1 3/4 cups white rice flour
1/2 cup potato flour
1/4 cup tapioca starch
1/4 cup powdered milk or sweet rice flour
2 Tbsp sugar
2 1/2 tsp xanthan gum
2 tsp yeast
1 1/4 tsp salt
1 cup water ( plus 2 Tbsp)
2 tsp cider vinegar
2 Tbsp oil
2 eggs
2 egg whites

  • In a large bowl, mix together dry ingredients. Mix very well and set aside.
  • In a separate bowl, using a heavy mixer with paddle attachment, combine wet ingredients until well blended.
  • With the mixer on the lowest speed, slowly add the dry ingredients to the wet ingredients until combined. You may need to scrape the bowl with a rubber spatula. With the mixer on the HIGHEST speed, mix for 4 minutes.
  • Spoon into prepared pan. Smooth the top with hands, using shortening. Let rise, uncovered, in a warm, draft free place for 60 to 75 minutes or until dough has risen to the top of the pans. Preheat oven to 350 and bake for 35 to 45 minutes (I bake mine for 35 minutes).
Enjoy! I have another gf bread recipe that I'm going to try.....stay tuned. :)

Monday, March 1, 2010

gluten free pizza crust

Pizza!!! I love pizza and having a gluten free and dairy/soy free diet restriction for the kids pretty much takes care of pizza. Until now. This crust turned out perfectly and acted just like wheat. Plus it has Italian seasonings in the dough so making a pizza with no cheese is still good. I made a large pizza with cheese and then a small single serve pizza without cheese for my daughter. She loved it. I think we can finally have pizza on our menu again. All thanks to my sister for sending me this fabulous recipe....thanks!!!

The recipe is from here. I made no changes to the original recipe, besides using sweet rice flour instead of powdered milk. That seems to be a great replacement for powdered milk.


Gluten Free Pizza Crust:


  1. Preheat oven to 425 degrees F.
  2. In medium bowl using regular beaters (not dough hooks), blend all ingredients on low speed.
  3. Beat on high speed for 3 minutes.
  4. (If mixer bounces around bowl, dough is too stiff. Add water if necessary, one tablespoon at a time, until dough does not resist beaters.) Dough will resemble soft bread dough.
  5. Put mixture on lightly greased 12-inch pizza pan or 11 x 7-inch pan (for deep dish version).
  6. Liberally sprinkle rice flour on dough, then press dough into pan, continuing to sprinkle with flour to prevent sticking to hands.
  7. Make edges slightly thicker to hold toppings.
  8. Bake pizza crust for 10 minutes.
  9. Remove from oven.
  10. Spread pizza crust with your favorite sauce and toppings.
  11. Bake another 20 to 25 minutes or until top is nicely browned.


Sunday, February 28, 2010

Coming soon......

I have a few recipes lined up to share with ya'll. Pizza crust, frosted sugar cookies and I'm currently trying out 2 new bread recipes. I will have them up soon!!!


Friday, February 19, 2010

Pumpkin Muffins

I am absolutely loving Annalise Roberts cookbook. It is currently my favorite gluten free cookbook. I have been trying a lot of her recipes lately. Mainly muffins and cookies at the moment. But there a lot of other good looking recipes that I will definitely have to try.

These muffins are the best gluten free muffins that I have ever had. Actually, they are the best pumpkin muffins I have ever had. Including wheat. The texture is perfect, they are moist, they are GOOD. Even my hubby, who isn't a fan of pumpkin, had to agree that they were very good. I froze a lot of pumpkin from our garden this year, so was glad to find another good use for it.

I did change the recipe slightly from the original, mainly cutting back on a few spices, so my hubby and kids would enjoy them. The original recipe calls for ground cloves and ginger, which I omitted. It also calls for molasses, but I replaced that with brown sugar.


Pumpkin Muffins

  • 1 3/4 cups brown rice flour mix (see below)
  • 1 cup sugar
  • 1 tsp baking soda
  • 3/4 tsp xanthan gum
  • 3/4 tsp salt
  • 1/2 tsp baking powder
  • 1/2 tsp cinnamon
  • 1/2 tsp nutmeg
  • 2 large eggs
  • 1/4 cup water
  • 1/3 cup plus 2 Tbsp vegetable oil
  • 2 Tbsp brown sugar
  • 1 cup pumpkin puree

Brown Rice Flour mix: 2 cups brown rice flour
2/3 cup potato starch (not potato flour)
1/3 cup tapioca flour

Preheat oven to 350. Grease muffin pan or use baking cups.
Mix dry ingredients together in large mixing bowl of electric mixer.
Combine eggs, water, oil, brown sugar and pumpkin in a separate bowl and whisk to blend.
Pour the pumpkin mixture into the dry ingredients and mix until well blended. Do not over beat.
Pour batter evenly into muffin tin and bake for 20-25 minutes or until toothpick inserted in center comes out clean. Remove muffins from pan immediately.

Enjoy! :)

Thursday, February 11, 2010

Chocolate Candy Cane Cookies

I'm a little slow at getting this posted. This was our favorite Christmas cookie this year. You can't go wrong when chocolate and candy canes are involved. :) You won't be disappointed.

Chocolate Candy Cane Cookies:
  • 1 bag semi sweet (or bittersweet) chocolate chips
  • 6 Tbsp ( 3/4 stick) unsalted butter
  • 3 eggs
  • 1 cup sugar
  • 1/3 cup gf flour mix
  • 1/4 tsp xanthan gum
  • 1/2 tsp. baking powder
  • 1/2 bag semi sweet chocolate chips
  • 1 cup chopped walnuts
  • 2 or 3 crushed candy canes

Directions:

1. Melt bittersweet chocolate chips and butter in medium saucepan over medium-low heat. Stirring constantly.

2. In large bowl with electric mixer beat eggs and sugar until thick; stir in chocolate mixture. In small bowl , stir together flour and baking powder; stir into chocolate mixture. Gently mix in semi sweet chocolate chips and walnuts

3. Refrigerate at least an hour or until firm. Preheat oven to 375 degrees, place spoonfuls 1 1/2 inches apart on parchment lined cookie sheet. Bake 12 to 14 minutes until shiny crust forms on top but interior is still soft. Sprinkle crushed candy canes over top of cookies immediately after taking them out of the oven.

Tuesday, December 8, 2009

Sweet biscuits!!

Since I started cooking/baking gluten free, I have been on a search for a good biscuit recipe. I have tried countless recipes and none of them have been even remotely good. I was beginning to think that you just couldn't make a good gluten free biscuit. Think again!! I recently found a buttermilk biscuit recipe in Annalise Roberts cookbook, Gluten free baking classics that I had to try. It was AWESOME. Melt in your mouth goodness. My kids thought they were cookies...probably didn't help that I used a cookie cutter to cut them out. Ha!

I did change the recipe a bit to make it dairy free as well. That didn't seem to affect the taste or texture at all.


Biscuits

Ingredients:

  • 3/4 cup Brown Rice Flour Mix (see below)
  • 1/4 cup Sweet Rice Flour
  • 2 teaspoons sugar
  • 2 teaspoons baking powder
  • 1/4 teaspoon baking soda
  • 1/4 teaspoon xanthan gum
  • 1/4 teaspoon salt
  • 1 tablespoon milk (or any milk substitute, I used almond milk)
  • 5 tablespoons cold unsalted butter, cut into 5 slices
  • 1 large egg white (or 2 small)
  • 2 tablespoons water

    • Brown Rice Flour Mix

  • Brown rice flour (extra finely ground) 2 cups
  • Potato starch (not potato flour) 2/3 cup
  • Tapioca flour 1/3 cup

Directions:

1.Preheat oven to 425 degrees. Position rack in center of oven.

2. Mix brown rice flour mix, sweet rice flour, sugar, baking powder, baking soda, xanthan gum and salt in large bowl of electric mixer. With mixer on low speed, cut butter into flour mixture until mixture is crumbly and resembles coarse meal. Put mixture into a small bowl and set aside.

3. Beat egg white in the same large bowl of electric mixer until very foamy. Add water, milk and flour mixture all at once, and mix at medium-low speed for 1 minute. Use lightly floured hands to pat out dough into a large 3/4 inch thick round on lightly floured surface. Cut out biscuits with a 2 1/2 inch round cookie cutter. Press dough scraps together and repeat.

4. Place baking sheet on center rack of oven and turn oven temperature down to 400 degrees. Bake 15 - 18 minutes or until medium golden brown. Serve immediately.


I used a star cookie cutter to make things more interesting.


Watch out, these will go fast!! There were no leftovers. I better make a double batch next time. :)

Wednesday, November 18, 2009

Chicken Tortilla Soup


Now that the weather is cooler, soup has been on the menu. Chicken Tortilla Soup is one of our all time favorites. I found this recipe on All Recipes and didn't have to do anything to make it gluten free. The soup is dairy free, but then you can add sour cream and shredded cheese to make it extra good. We have used plain soy yogurt or plain coconut yogurt in place of the sour cream and that worked great.

The soup is good without the extra toppings, but with the toppings it's awesome. You can use any corn chips that you choose, I use corn tortilla chips. Don't skip the diced avocados either, that adds so much flavor.


(I really need to work on my food photography, but you get the general idea.)

Chicken Tortilla Soup
  • 4 boneless chicken breast halves, cooked and shredded
  • 2 (14.5oz) cans chicken broth
  • 1 (4oz) can diced green chiles
  • 1 (10oz) can diced tomatoes with green chile peppers
  • 1 onion chopped
  • 2 cloves garlic, minced
  • 1 Tbsp fresh lime juice
  • 2 Tbsp fresh chopped cilantro
  • 1/2 tsp ground cayenne pepper
  • 1/2 tsp ground cumin

Combine the chicken broth, green chiles, tomatoes with green chiles, onion and garlic into a soup pot. Add the shredded chicken. Bring to a boil, stirring frequently. Reduce heat and simmer for 30-35 minutes.

Add the lime juice, cilantro, cayenne and cumin. Simmer for 10-15 minutes longer.

Ladle the soup into bowls. Garnish with shredded cheese, diced avocados, sour cream and crushed corn tortilla chips.

Go to Gluten-free Homemaker for more awesome gluten free menu ideas.


Sunday, October 11, 2009

Pork Chops with Scalloped Potatoes

As a mom to 2 small children, I am always looking for easy recipes. I found this recipe on allrecipes and it has now been added to my stash of recipes. It's easy to prepare and it doesn't have a lot of special gf ingredients in it. We enjoy it, hope you do too!

Pork Chops with Scalloped Potatoes
  • 3 Tbsp butter or olive oil, divided
  • 1/2 tsp salt
  • 1/4 tsp pepper
  • 1 Tbsp gf flour mix (I used Bob's Red Mill all-purpose flour, but cornstarch would work well also)
  • 3/4 cup chicken broth
  • 4 pork chops
  • 4 cups thinly sliced potatoes
  • dash paprika

Preheat oven to 350F. In sauce pan, melt 1 tablespoon butter over medium heat. Add salt, pepper and flour (or cornstarch). Pour in the chicken broth, cook and stir until mixture boils. Remove from heat and set aside.

In skillet brown pork chops in 1 tablespoon butter, making sure not to overcook. Grease a cooking dish with the remaining tablespoon of butter and layer potatoes. Pour mixture over potatoes and place browned chops on top. Sprinkle paprika on top. Cover and bake for 1 hour. Uncover and bake for an additional 30 minutes.

Tuesday, October 6, 2009

German Chocolate Cake

We celebrated my father in-law's 70th birthday at our house tonight. No birthday is complete without a birthday cake, so I happily made one. :) I recently got a new cookbook, Cooking with Coconut Flour which has a gluten free, dairy free german chocolate cake recipe in it. That recipe was what convinced me that I had to have this cookbook. I have been looking for a good gf german chocolate cake for a while, and this is it. This cake is awesome. Everything a german chocolate cake should be. The cake texture was perfect. Nice and moist, not the slightest bit crumbly. There were people at the party that do not eat gluten free, and they were raving about the cake. That's the best compliment ever when baking gluten free!!

I frosted the cake a little too soon, so a lot of the frosting started falling off. It still tasted good. :)

German Chocolate Cake
(Makes a double layer cake)

2/3 cup butter or Earth Balance Soy free buttery spread
1 cup cocoa powder
8 egg whites
1/4 tsp cream of tartar
2 whole eggs
8 egg yolks
1 cup coconut milk
2 cups sugar
1 tsp salt
1 tsp vanilla
1 cup sifted coconut flour

Melt the butter in a saucepan over medium heat. Add cocoa powder and mix well. Remove from heat and let it cool. Beat egg whites and cream of tartar until stiff peaks form. In a separate bowl, combine 2 whole eggs, egg yolks, coconut milk, sugar, salt and vanilla. Stir in cocoa mixture. Add coconut flour and whisk in until there are no lumps. Fold egg whites into batter. Pour batter equally into 2 greased round 9 inch cake pans. Bake at 350 for 35 minutes, or until toothpick comes out clean when inserted into cake. Let cool. Fill layers and cover top and sides of cake with Coconut-Pecan Frosting.

Coconut-Pecan Frosting

1 cup coconut milk
1 1/2 Tbsp cornstarch
1 cup sugar
2 egg yolks
1/2 cup butter or Earth Balance soy free buttery spread
1 tsp vanilla
1 1/3 cup flaked coconut
1 cup chopped pecans

Mix coconut milk, cornstarch, sugar, egg yolks and butter in a saucepan. Cook over medium heat until mixture thickens, stirring constantly. Remove from heat and add vanilla, flaked coconut and pecans. Let cool before frosting cake. (I doubled the frosting recipe)


Go ahead, take a bite. You know you want to. :)

Wednesday, September 30, 2009

Gluten free noodles


The weather turned really chilly the past few days, and it seemed like a good time to make some soup. Chicken noodle soup is an all time favorite around here. I used to make homemade noodles all the time, before going gluten free. To me, it just makes the soup better. I found a good gluten free noodle recipe at Cooks.com that has become my standby for noodles.

You can use your favorite chicken noodle recipe, and then just use these noodles instead. The first time I made them, my husband asked me if they were really gluten free. Yay! That was what I was going for. :)

Gluten Free Noodles:
  • 1/2 cup tapioca flour
  • 1/2 cup cornstarch
  • 3 tablespoons potato starch
  • 3/4 teaspoon salt
  • 4 1/2 teaspoons xanthan gum
  • 3 large eggs
  • 1 1/2 tablespoons vegetable oil

Directions

1) In a medium bowl, combine flours, salt, and xanthan gum.

2) Beat the eggs lightly and add the oil.

3)Pour the egg-oil liquid into the flour mixture and stir.

4)Work the dough into a firm ball. Knead for 1 or two minutes.

5)Place the ball of dough on a potato starch-floured (rice flour turns noodles gray) breadboard and roll as thin as possible. This dough is tough and, when almost transparent, will still handle well. (I actually used my kitchen-aid pasta roller on the widest setting and that worked out very well.)

6) Cut into desired shape.

7) To cook pasta: Put pasta into the boiling soup and cook for 10-12 minutes.


This picture is a bit washed out, the soup looked much better in person. It definitely tasted delish!! For more gluten free recipes, go to The Gluten-Free Homemaker where you'll find all sorts of wonderful things to eat.

Bon Appetit!